Total Pageviews

Thursday, August 22, 2024

Jumpstarting a drained Toshiba C-50 ASP53xx Battery (Type:PA5024U)

Good News I was able to jumpstart the battery pack that I thought I was going to replace again at 50usd cost. This battery ended up to be of the simple ones that you can jumpstart applying a voltage and current in the + - terminals. 

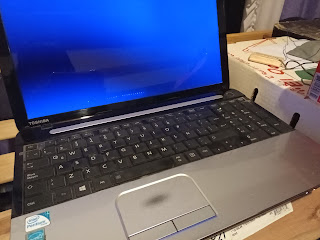
My Toshiba C-50 ASP, main DJing rig
First I recommend checking what has caused your battery to deplete and be useless saying that is 100% charged but when you unplug the charger it shuts off immediately. In my case and probably other cases too, the problem was that the laptop reactivated while it was in the backpack or any other strange circumstance that I am not able to identify, but the most probable culprit is that a couple of times I stored the laptop in a vertical position in where the lid opened and the laptop reactivated until the battery was drained below the critical level.

The problem of this type of battery is that if it is depleted below certain level, the main controller chip seems to fail to receive the necessary voltage in order to work and communicate with the mainboard. If there is no communication between the battery and the laptop, the default state seems to be a false 100% charged reporting thus the mainboard will not provide any charging voltage to the terminals.

In order for the mainboard to activate these terminals, it seems it needs to receive a voltage measurement that corresponds with a somewhat discharged battery, when a battery is below 100% there is a voltage drop and this can be interpreted as x% of remaining level. But if the mainboard receives a voltage below DC 1v, like 0.05v to say an example, it will interpret as the battery is not sending any signal because is 100% charged thus the mainboard will keep on AC power circuit, bypassing the battery circuitry. I'm not an expert but that's how I see this "design bug" happens.

I must give the credit for this tutorial to the author of the video I'm sharing here, that when I watch it I was very skeptical it would work, but thanks Gd I was able to recover my totally drained battery benefiting from the steps shown here:

how to charge the laptop battery without laptop - YouTube

Okay, so take into account this method will not recover the total capacity that is reduced due to letting a li-ion battery drain to zero, that is a very harmful event that may reduce the battery life a lot, for example my battery was 2hs duration when it was new and after several times that it happened, now it only lasts 40min.

1) Prepare a work area with appropriate charging system, you should be able to measure a minimum voltage in the terminals that indicate it's possible to jumpstart it.

2) IMPORTANT Identify the negative terminal in the laptop, that terminal is the one that has full conductivity with GND, for example measuring resistance between this terminal (on the left according to the battery in the position shown in the photo shown above)

3) Applying a small charge to the battery outside the laptop; For me it worked to apply for a couple of minutes (around 4-8') a voltage of 12v @ 1A of DC power with a stabilized DC supply (a router DC adaptor).
This is the charging system I used to jumpstart the battery.


4) Testing if the battery now has a voltage reading; With your multimeter the battery should now read a voltage of 12v (a bit above 10.8v, but it's in margin) so the mainboard will not initiate the charging circuit when measuring this voltage because it equals to a fully charged battery, but in the next step when you remove the charging plug the laptop SHOULD REMAIN POWERED ON!

5) Testing if the battery holds energy to keep the laptop running; So now re-install the battery in the laptop tray; If you arrived to this step, it means the battery is in shape to be jumpstarted, this step is very important because you need to power on the laptop (with the DC power charger connected) to the BIOS (because it's a lower consumption state) and remove DC plug for a couple of seconds to check if it works and reconnect it; Now the laptop should remain running on battery, reconnect DC charging plug immediately.

6) Jumpstarting the charging circuit; you have a few seconds to do this!
- Remove the DC charging plug from the laptop again and the battery will start to drain the little charge you applied to its terminals in those 4-8 minutes, the battery orange LED will start to blink and at this point re-connect the DC charging plug! You have a few seconds, if you don't do it on time the battery would be fully depleted again and the process will fail. In the moment the LED blinks, that's when the circuit has been activated!

7) Finally the laptop should begin to charge the battery again, you will have all three leds ON (Orange Battery LED, POWER, Wi-Fi), wait for a few moments before booting the OS or just turn off the laptop and leave it to charge in powered OFF state. I won't recommend to charge it while using. Maybe you can charge it in standby mode but not while in normal use.

8) To prevent this happening again, DON'T LEAVE YOUR BATTERY in the laptop, store it 80% level and only when you need "UPS" (in my case when I don't have a stable AC power supply like a 2-stroke petrol generator).

The best practice is, unless you have a special system in your laptop that extends the battery life by only charging at 80%, just remove the battery with a decent amount of energy stored, and store it in an appropriate location. Also make sure that the BIOS setting does not allow to power ON the laptop by opening the lid. For now I won't continue investigating what caused the laptop to activate and to drain the battery to ZERO, because last time I checked it was set to hibernate when a critical level was reached.

Another good practice is to change the minimum and critical levels on power settings that are set in vey low levels by default. The low level for a laptop battery should be no less than 50% and the critical level no less than 20%. I've set 80% low level (laptop goes to standby mode) and 50% to critical level in which case it will hibernate.

The original battery pack was damaged.


Monday, December 2, 2019

Numark DJ io timed out driver install error

Problem was quite easy to solve, if you are installing this usb external soundcard under xp, you probably need for sure attach the external 5-6v DC supply. Even more, its recommended to always use dedicated external power supply or 1amp from an USB 3.0 port. Drivers provided by numark on the net we're fine, trouble was this annoying card is power hungry. Specs tells you about a 6v 1A so you can imagine it is not something optional. Amazing mis info from the manufacturer, almost no support from them and we don't know what chip it uses.

Sunday, November 10, 2019

VPN server, Windows 8.1 no funciona.

Problema: Al conectarse desde un smartphone o una pc aunque conecta (50% de los casos desde android) la conexion carece de toda funcionalidad, no se pueden acceder a archivos compartidos ni a escritorio remoto ni mucho menos el cliente puede utilizar nuestra conexion para su privacidad.

Test 1 -  Agarramos un notebook con windows xp y creamos una nueva "incoming connection", los unicos parameros que cambiamos son que el rango de ip del cliente sera del 192.168.0.20 al 192.168.0.30 (el primer lugar es asignado al equipo servidor de la VPN).

Para probarla de manera rapida y sencilla solo usamos el nombre de equipo en la red como direccion ip y para ver si funcionan los archivos compartidos ponemos la ip del servidor que es \\192.168.0.20.

Resultados: Funciona todo menos la conexion a internet.

Test 2 - Volver a crear la VPN Incoming Connection y desactivar el firewall de windows 8.1 en su totalidad. Ahora si funciona la conexion pero es inseguro dejar el firewall apagado teniendo un router con upnp activado, si un virus entra puede usar upnp para abrir el puerto que necesite y destruir nuestro sistema.

Test 3 . Probando conectividad desde el celular
Despues de varios intentos y de haber desconectado el usuario activo pc a pc primero que todo, el dispositivo android del cliente ya esta conectado a la red VPN y puede acceder a su sesion de escritorio remoto en caso de que solo ande compartir archivos o impresoras.

Saturday, September 7, 2019

Conectar un segundo router a un router en puente / bridge (Usando AR-Link Rio Gallegos)

Basicamente solo debemos hacer dos pasos para conectar un router a una red ya existente, desactivar DHCP y cambiar la ip del router secundario. Para este caso nos basamos en el Cablemodem WI-FI Router provisto por el servicio de fibra optica AR-Link disponible en Rio Gallegos, Argentina. Es curioso que este servicio nos provea de 10 megabits por segundo de navegacion (10 Megas / Mbps) cuando el estandar hasta hace un año o dos era el pesimo servicio de Speedy / Telefonica con 512kbps de subida y 1mbps de bajada.

El primer paso es desactivar el DHCP en el router que queremos usar como secundario, una vez que hagamos esto al conectarnos a este router ya no va a responder salvo que tengamos la conexion ethernet lista. Pero para no complicarnos mejor hagamoslo todo paso por paso.

1) Conectemos el router secundario a la corriente y encendamoslo.

2) Para configurarlo necesitaremos preferentemente una notebook conectada a este router a uno de los 4 puertos LAN (no al WAN!)

3) Ingresemos en la notebook usando el browser la direccion ip del router para entrar al menu.

4) Busquemos entre las opciones de red LAN el servidor DHCP del router y desactivemoslo.

5) Una vez desactivado ya no podremos seguir configurandolo hasta que no establezcamos una ip manual en la conexion LAN de la notebook. En este caso usamos un router ENCORE de 150Mbps y la ip manual que usamos es 192.168.0.117. Los demas parametros no son necesarios configurarlos.

6) Ahora cambiemos el segundo parametro en el router, su direccion IP predeterminada, este paso es necesario para que podamos configurar los dos router las veces que necesitemos y no se superpongan las IP de configuracion por el navegador predeterminadas que suelen ser 192.168.1.1 o 192.168.0.1. En este caso el cablemodem utiliza la ip 192.168.0.1 asi que le asignaremos al router secundario la ip 192.168.0.254

7) Por ultimo desconectemos la notebook del router y conectemos ese extremo de cable de red a uno de los 4 puertos del cablemodem.

8) Ya deberiamos tener internet en el router secundario, por si acaso reiniciemos uno o ambos router.

Monday, July 22, 2019

Setting Up a IIS FTP server on Windows 8.1 (Quite Hard!)

As it was in Windows XP, just a few clicks to create an IIS FTP server but this is not the case, although you needed Windows CD-ROM, or the other way around, with Windows 8.1 you don't need any disk but the process is not the same and it may lead to "bugs" if not done properly.

1) Turn on Windows Features or on
2) Mark whole FTP Server and within "Web Management Tools" mark "IIS Management Console", "IIS Management Scripts and Tools" and "IIS Management Service".
3) Now open the IIS Management Console, in this case I use ClassicShell for a classic start menu, is highly recommended.
4) Right Click to add a new FTP Site and fill the boxes with this info, I don't feel very safe sharing through ftp the whole drive.
5) Next step is very important, we don't wanna mess with advanced features, just put basic authentication or you won't be able to log in:
6) to be continuated

Monday, July 1, 2019

Discovered how to fix unspecified error installinc vc_redist for OBS Studio 32bit

Windows 8.1 x64
After trying several things to install the newest version of OBS Studio, a software for live streaming, it appears that solution has been found. Install the UNIVERSAL C RUNTIME.
The files for this were really hard to find, but we found them in an Adobe Premiere support one.

I don-t know what for 64bit version of obs is, for now 32bit is working normally.

https://helpx.adobe.com/es/creative-cloud/kb/vc2015_update.html
Mirror>https://drive.google.com/drive/folders/14w6Xlu8ujYhry8YRFQtUrhvjY1QB9vBr?usp=sharing
A will post a mirror for these files, they are around six update packages, updating windows didn-t work for me. Also tried refreshing windows by recovery options and even reinstalling whole system. It-s a lot of less work that windows can install over the same drive letter unit and sizes are not added, it is supposed that a windows install will not take less thatn 20GB, I had little free space but when installed windows I didn-t get out space error.

to be continued...

Monday, December 3, 2018

Jamas uses Cortar y Pegar (Cut and Paste) al transferir archivos al PC - Android.

Si creiamos que manteniendonos en la memoria interna de los moviles android estabamos seguros, nos equivocamos. Mantenernos lejos del almacenamiento basado en microSD cards es inseguro, pero en la memoria interna tambien pueden ocurrir bugs que lleven a la perdida de informacion. Como es el caso del telefono que usaremos como ejemplo para intentar buscar una solucion, donde la ultima opcion es rootear y hacer un "dump" de la memoria interna a nuestra pc con complicadas herramientas de linux en sus versiones windows. Herramientas tales como busybox y cygwin que nos permiten teniendo el equipo rooteado hacer un volcado de memoria mediante un protocolo local de red.

La situacion con nuestro movil fue, quisimos liberar espacio cortando la carpeta DCIM a nuestro ordenador o mejor dicho a una ubicacion de red y un bug hizo que windows entendiera que el proceso ya estaba finalizado y la carpeta se borró como sucede en todo cut and paste. Ahora nuestros archivos importantisimos se han ido y estamos probando distintas herramientas como el novedoso dr. phone que parece estar haciendo el trabajo necesario, para toda operacion de desarrollador el primer paso siempre es habilitar el modo de depuracion usb o usb debugging, proceso sencillo que incluye tocar varias veces en "build" en opciones del telefono.
"
Case 2: Android phone does NOT connect as a hard drive
Recent Android phones and tablets, especially those without an SD card, do not connect as a hard drive, but as a multimedia player. The icon that appears in My Computer is different, and there is no drive letter .
You can force an Android phone to connect as a hard drive ( mass storage ), but it is a very complicated procedure, since it involves rooting (unlocking) the device and using difficult-to-use utilities." https://www.quora.com/How-can-I-recover-the-files-that-lost-during-cut-and-paste


Probando dr.fone para android -  FAILED ON MOTO G5 32GB 5TH, segundo intento: ROOT FAILED


En este momento el telefono se ha reiniciado luego de supuestamente hacer un "root" temporal y desbloqueamos la pantalla, sin embargo nada ha pasado... Al cabo de unos momentos aparecio una leyenda de "connectiing..." y de nuevo volvemos a la pantalla de inicio donde seleccionamos el tipo de archivos a recuperar y nos pide hacer un root otra vez, parece que esta utilidad aunque es bastante avanzada y usa la tecnica correcta no es capaz de recuperar nada, detecta y todo, pero estamos de vuelta en la pantalla de inicio.

Ahora nos enteramos que desde android 6 los telefonos vienen encriptados por defecto! Uhy y ahora como hacemos para y si es que llegamos a tener que usar cygwin? Si "dumpeamos" una imagen encriptada de la memoria interna no podremos recuperar nada!

ALTO! Hemos leido que dr.fone puede ser scam o simplemente es un software poco fiable, algunos usuarios han reportado incluso brick de sus moviles! No seguiremos adelante con esta prueba porque no queremos que no solo no recuperes tus fotos o videos sino que tambien brickees el movil.
Fuente

Mas info de dr.fone:

"Problem 1: Galaxy S7 edge stuck in bootloop after stopping Dr. Fone software installation

Hi. I have a problem with the Galaxy S7 edge (SM-935F) of my mother’s. She accidentally deleted some photos and I wanted to get back those photos using an Data Recovery Software (Dr.Fone). While it was in Download Mode doing its thing (hasn’t started analyzing yet, just installing some recovery package), it stuck at 100% for a long time and couldn’t go on. So I wanted to abort it (I think I restarted the phone because there wasn’t a stop function in the program, but not sure anymore what I exactly did), and now it stucks at the samsung logo. I tried so much, I went to download mode and tried doing it again and fixing with functions given by Dr. Fone. I did soft restart so often, I restarted it when going into download mode (you can choose if you really want to go into download mode or restart), I can’t get into soft mode. I restarted it from recovery mode, I wiped the cache partition, I also wanted to try FonePaw but it doesn’t support this phone.
Now I’m helpless because I don’t want to do a factory reset. All I need is to somehow get those deleted photos. After I got those I can do a factory reset because there isn’t anything other important stuff on it, only those photos. So a solution with using the download mode and a PC to get those photos without fixing that the phone can’t start properly would also be great for me.
I can go into download mode & Recovery Mode, but not start it normally or in safe mode. I live in Switzerland and am not quite sure on the Android version, but I think it is Nougat. Best regards. — Arbenit Kamberi
Solution: Hi Arbenit. One of the surest way to brick a phone is to interrupt it while it’s installing something, be it an app or a new operating system version. Sometimes, installations can take several minutes depending on the software or app being installed. The intentional interruption that you did may have corrupted the storage device. This often occurs if an installation that involves scanning an entire drive is stopped prematurely. We don’t know how Dr. Fone’s software installation works but most probably, it requires a complete drive scanning since it’s a recovery software. Software of this type can take a long time to install since it needs to read the entire storage device for bits and pieces. Any good recovery software has to be thorough in order to read broken bits and combine them with others to form as recoverable files.
Terminating the entire scanning/installation process is not a good idea at all. It’s the same catastrophic situation that result if you stop or interrupt an Android system update. That’s why it’s recommended that you back important files up and ensure that the phone has enough battery before installing an update. Whether a user turns the device off, or the phone simply turns off due to low battery, the result is always the same — either the phone gets stuck in a bootloop, or the storage device becomes corrupted (complete hardware failure). Unfortunately, either of the two resulting situations require drastic solutions to fix, which in your case, means that you should try factory reset or flashing.
To see if there’s another way to fix the problem without resorting to factory reset or flashing, we suggest that you contact Dr. Fone technical support. We are not very optimistic about other options but you should give it a try."

 continuará....

Jumpstarting a drained Toshiba C-50 ASP53xx Battery (Type:PA5024U)

Good News I was able to jumpstart the battery pack that I thought I was going to replace again at 50usd cost. This battery ended up to be of...